-
Vintage-My new tutorial
Vintage
 This tutorial has been made with Psp9, it's also possible with other versions of Psp.İf you want to present my tutorial on your forums or sites, please ask to me first.İf you publish your creation on a site or a blog,please put a link towards the tutorial if you create a tag.
Thank you to understand and respect the rules.©Msrf Designs


Used filters:Alf’s power toysGraphic plus Two moonSimple MuRa's Seamless AP 01-innovationMaterials:1 Vintage woman2 Misted landscape2 png home2 Floral corner
3 Selection1 Gradient1 Color paletteMaterials download Alternative material link
Preparation 1: Copy Vintage Selections > Go to > My Psp Files > Paste to Selections folder
Preparation 2: Copy Gradient > Go to > My Psp Files > Paste to Gradients folderUsed colors #dfd6d6 #be5055Note: You can change blend mode or opacity according to your color
So let's start1File-New-New İmage 800 x 550 px.
2 Materials> Material properties > Gradient > raffaele1
Prepare a radial gradient based on the values below.
Angle: 1 Repeats: 3
Horizontal: 50 , Vertical: 50

 Fill
Fill with gradient3Effects-Distortion effects-Twirl
Degrees: 50
4 Effects- Plugıns-Alf’s power toys>Mirror offset
5 Effects-Plugins- Graphic plus-Metal border
6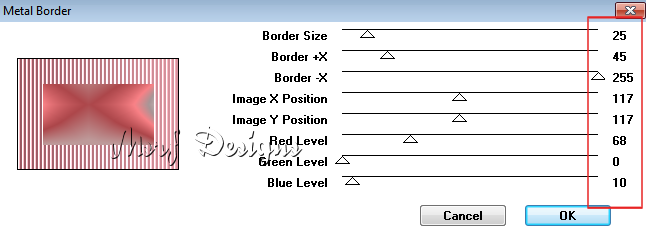 Layers-Duplicate Effects- Plugıns-Two moon-Verticalchopblur...Effects- Edge Effects- Enhance 7
 Effects- Plugıns-Simple> Pizza slice mirror 8Effects-Reflection effects- Rotating mirror
9 Selections- Load /Save selection> Load selection from disk-Vintage1 Layers- New Raster Layer
 Fill with color:#dfd6d6
10Effects- Plugıns-MuRa's seamless> Emboss at Alpha...
(Default)
11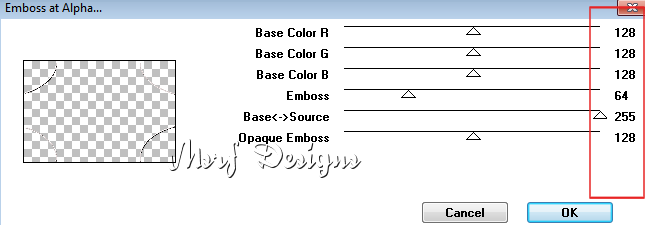
Effects-3D Effects- Drop shadow
1/1/80/8 #000000

12
Selections- Select none
13
Layers-New Raster Layer
Selections- Load /Save selection> Load selection from disk -Vintage2
Fill with color #dfd6d6
Effects- Plugıns-MuRa's seamless- Emboss at Alpha...
(Default)
Selections-Select none
14
Layers-Duplicate
İmage-Flip
Layers-Merge-Merge down
Effects-3D Effects- Drop shadow
1/1/80/8 #000000
15
Layers-New Raster Layer
Selections- Load /Save selection> Load selection from disk - Vintage3
Fill with color #dfd6d6
Effects- Plugıns-MuRa's seamless- Emboss at Alpha...
(Default)
Selections-Select none
Effects-3D Effects- Drop shadow
1/1/80/8 #000000
16
Close the eyes of the two bottom layers.
Activate the top layer.Layers-Merge-Merge visible
17
Open the eyes of the two bottom layers.
Activate the top (merged) layer.
Magic wand > click on the middle and select
 Selections- Modify- Expand 7 pixel
 Effects-3D Effects- Cutout

Layers- New Raster Layer
18Open the "Villa in Capri" tube
Edit-CopyActivate your workEdit-Paste into selection19
Adjust- Sharpness- Sharpen more
20
Selections- Select none
21Activate the " Copy of raster 1" layerOpen the "Misted landscape"
Edit- Copy
Activate your workEdit- Paste as new layerWarning: İf your landscape is different and if necessary, resize with > İmage-ResizePlace it however you want, but don't let it come out of the frame23Add borders 2 px, symmetric, color: #be5055Add borders 2 px, symmetric, color: #dfd6d6Add borders 2 px, symmetric, color: #be505524
Selections- Select allİmage-Add borders 30 px. symmetric, color: #dfd6d6Selections- Select invert25
Effects- Plugıns-AP 01-İnnovation> Distort- Wavycut
10-10-10-10 Option: wave 7
Ok.
 Effects-Edge Effects- EnhanceSelections- Select none26Open the "Floral corner"
Edit-CopyActivate your workEdit- Paste as new layerİmage-MirrorDeform Tool
Position X: 570 Position Y: 39Adjust-Sharpness-Sharpen Effects - 3D Effects- Drop shadow 5/5/80/10 color: #000000
27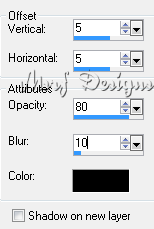 Open the "Vintage woman"
Edit-CopyActivate your workEdit- Paste as new layerİmage-MirrorPlace it on the left side as final workWarning: İf your ltube is different and if necessary, resize with > İmage-ResizeAdjust- Sharpness- SharpenEffects- 3D Effects-Drop shadow
2/2/80/30 color: #000000
28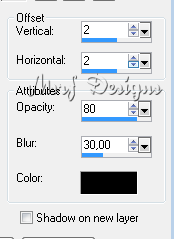 Layers-New Raster Layer
Add your name or watermarkt29Add borders 2 px, symmetric, color:#be5055Add borders 2 px, symmetric, color: #dfd6d6Add borders 2 px, symmetric, color: #be5055
File-Save as > Jpeg
The result is below:Another version: Misted landscape and tube from the internetThank you

March 2020
İf you wish you can post your versions on my Facebook pageYour versions:
Merci Franie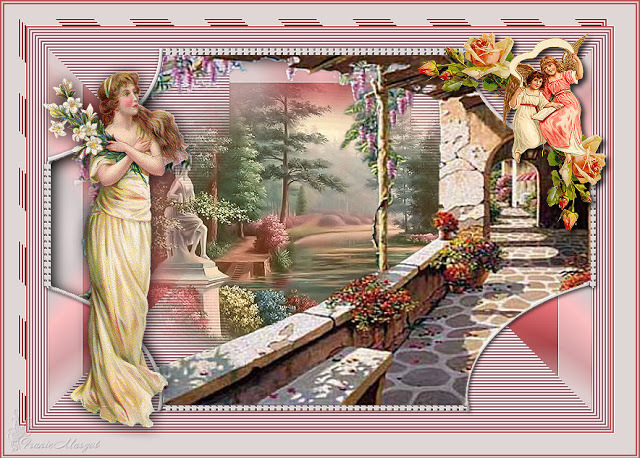
Franie 2. version, Merci
Grazie Pinuccia
 Tags: vintage, Msrf Designs, Psp tutorials
-
Comments
My PSP Tutorials and Translates
-
Wolcome to
my tutorial blog


-
My translators
( Psp tutorial translators)
Thanks to all...


merci merci de ton passage chez moi
tres jolie ce tutoriel
bonne soirée
bisous